How To Draw 30 Degree Angle
News Leon
Mar 24, 2025 · 6 min read
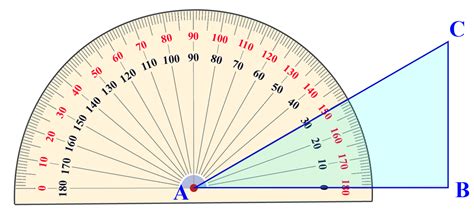
Table of Contents
How to Draw a 30-Degree Angle: A Comprehensive Guide
Drawing precise angles is a fundamental skill in various fields, from engineering and architecture to art and design. While digital tools make this easier, understanding the manual process remains crucial for understanding geometric principles and developing spatial reasoning. This comprehensive guide will walk you through multiple methods of accurately drawing a 30-degree angle, catering to different skill levels and available tools.
Understanding Angles and Degrees
Before we delve into the drawing process, let's refresh our understanding of angles and degrees. An angle is formed by two rays or line segments that share a common endpoint, called the vertex. A degree is a unit of measurement for angles, with a full circle containing 360 degrees. A 30-degree angle is therefore a relatively small angle, representing one-twelfth of a full circle.
Method 1: Using a Protractor
The most straightforward method for drawing a 30-degree angle involves using a protractor. This is the preferred method for accuracy, especially for beginners.
Steps:
-
Draw a Baseline: Begin by drawing a straight line segment using a ruler. This will serve as the baseline for your angle. The length isn't critical at this stage.
-
Position the Protractor: Place the protractor's center point (usually marked with a small hole or crosshair) precisely on one endpoint of the baseline. Align the protractor's 0-degree mark with the baseline itself. Ensure the protractor is firmly placed and doesn't move during the process.
-
Locate 30 Degrees: Locate the 30-degree mark on the protractor's scale. Protractors typically have two scales (inner and outer), so make sure you're using the correct one.
-
Mark the Point: Make a small, precise mark on your paper at the 30-degree mark on the protractor.
-
Draw the Second Ray: Remove the protractor and use your ruler to draw a straight line from the endpoint of the baseline (where the protractor's center was placed) through the mark you just made. This line, together with your baseline, forms the 30-degree angle.
Method 2: Using a Set Square (Triangle Ruler)
A set square, often a 45-45-90 or 30-60-90 triangle, offers a quick and accurate way to draw 30-degree angles, especially if you need multiple angles of the same size. The 30-60-90 triangle directly provides the 30-degree angle.
Steps:
-
Draw a Baseline: As before, start by drawing a straight baseline.
-
Align the Set Square: Place the longer side (hypotenuse) of your 30-60-90 set square along the baseline. Ensure it is precisely aligned.
-
Draw the Second Ray: Use the edge representing the 30-degree angle to draw a line segment from the endpoint of the baseline. This line, together with the baseline, forms your 30-degree angle.
Method 3: Constructing a 30-Degree Angle with Compass and Straightedge
This method demonstrates a geometrical construction, showcasing the fundamental principles of Euclidean geometry. While more involved, it's a valuable exercise in precision and understanding.
Steps:
-
Draw a Circle: Using a compass, draw a circle with a radius of your choosing. Mark the center point as 'O'.
-
Draw a Radius: Draw a straight line segment (radius) from the center 'O' to any point on the circle. Mark this point as 'A'. This forms the baseline for our angle.
-
Draw an Equilateral Triangle: With the compass still set to the same radius, place the compass point at 'A' and draw an arc intersecting the circle. Mark the intersection as 'B'. Triangle OAB is now an equilateral triangle (all sides equal in length).
-
Bisect the Angle: Place the compass point at 'A' and draw an arc. Repeat this with the compass point at 'B' using the same radius, ensuring the arcs intersect. Draw a line from 'O' through the intersection point of these two arcs. This line bisects the 60-degree angle of the equilateral triangle, creating two 30-degree angles. One of these angles is your 30-degree angle.
Method 4: Using a Computer-Aided Design (CAD) Software
For precise and repeatable angles in a digital environment, CAD software is invaluable. Programs like AutoCAD, SolidWorks, or even free options like FreeCAD offer precise angle tools.
Steps: (General, as specific steps vary depending on the software)
-
Create a Line: Draw a straight line using the line tool. This will be your baseline.
-
Use the Angle Tool: The specific name and location of this tool vary depending on the CAD software. Search for terms like "angle," "arc," or "line at angle." This tool typically allows you to specify the angle and the starting point of the second line.
-
Input 30 Degrees: Enter 30 degrees as the angle value.
-
Create the Angle: The software will automatically create a line forming the 30-degree angle with your baseline.
Refining Your Technique: Tips for Accuracy
Regardless of the method you choose, several tips can enhance the precision of your 30-degree angle drawing:
-
Sharp Pencil: A sharp pencil is crucial for creating crisp, clear lines. This minimizes errors in marking and drawing.
-
Precise Measurements: Double-check your measurements using the ruler or protractor.
-
Light Pencil Strokes: Use light pencil strokes initially so you can easily erase and correct any mistakes. Darken the lines once you are satisfied with the accuracy.
-
Practice: Consistent practice is key to mastering the art of drawing accurate angles. The more you practice, the more confident and precise you will become.
Applications of 30-Degree Angles
Understanding how to draw a 30-degree angle is more than just a geometric exercise. This skill finds practical applications in diverse areas:
-
Engineering and Architecture: 30-degree angles are frequently used in structural design, creating specific slopes, and determining angles for load distribution.
-
Graphic Design: Precise angles are crucial in logo design, creating visual balance, and arranging elements on a page.
-
Art and Illustration: Artists frequently use angles to create perspective, depth, and visual interest in their artwork.
-
Construction: Understanding angles is essential for cutting materials accurately, ensuring proper fitting, and constructing stable structures.
-
Cartography: Maps utilize angles to depict directions and geographical features accurately.
-
Trigonometry: The 30-60-90 triangle, with its inherent 30-degree angle, forms the basis for many trigonometric calculations and geometrical problems.
Conclusion: Mastering the 30-Degree Angle
Drawing a 30-degree angle accurately is a fundamental skill with wide-ranging applications. By mastering the methods outlined above, you'll develop a stronger understanding of geometry, improve your drawing precision, and enhance your abilities in various creative and technical fields. Remember that practice makes perfect, so keep experimenting, refining your technique, and enjoying the process of learning. The ability to accurately draw a 30-degree angle is not just about the angle itself; it's about developing a deeper appreciation for precision, measurement, and the underlying principles of geometry. Embrace the challenge, and you will find your skills steadily improving with time and dedicated effort.
Latest Posts
Latest Posts
-
Which Particle Is Found In The Nucleus Of The Atom
Mar 26, 2025
-
Two Long Straight Wires Are Separated By 0 120 M
Mar 26, 2025
-
Who Was The First Person To See Cells
Mar 26, 2025
-
4 Functions Of A Political Party
Mar 26, 2025
-
Where Does Mitosis Take Place In The Body
Mar 26, 2025
Related Post
Thank you for visiting our website which covers about How To Draw 30 Degree Angle . We hope the information provided has been useful to you. Feel free to contact us if you have any questions or need further assistance. See you next time and don't miss to bookmark.
