How Do You Make A Magnet At Home
News Leon
Mar 19, 2025 · 6 min read
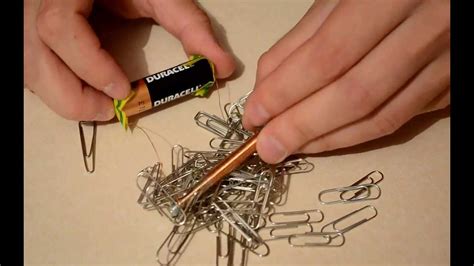
Table of Contents
How to Make a Magnet at Home: A Comprehensive Guide
Making a magnet at home might sound like a complex scientific experiment, but it's surprisingly simple and a fun project for both kids and adults. This guide will explore various methods, from the simplest techniques using readily available materials to more involved processes that demonstrate deeper electromagnetic principles. We'll cover the science behind magnetism, safety precautions, and tips for maximizing your success.
Understanding Magnetism: The Basics
Before diving into the methods, it's crucial to understand the fundamental principles of magnetism. Magnetism is a force that arises from the movement of electric charges. At the atomic level, electrons orbiting the nucleus generate tiny magnetic fields. In most materials, these fields cancel each other out, resulting in no overall magnetic effect. However, in ferromagnetic materials like iron, nickel, and cobalt, the electron spins align, creating a strong, macroscopic magnetic field. This alignment is what makes a material magnetic.
Key Concepts:
- Magnetic Domains: These are regions within a ferromagnetic material where the atomic magnetic moments are aligned. In an unmagnetized material, the domains are randomly oriented. Magnetization involves aligning these domains.
- Magnetic Field Lines: These invisible lines represent the direction and strength of a magnetic field. They emerge from the north pole and enter the south pole of a magnet.
- Magnetic Poles: Every magnet has a north and a south pole. Opposite poles attract, while like poles repel.
Method 1: The Simple Stroking Method
This is the easiest and most accessible way to make a magnet at home. You only need a strong existing magnet and a ferromagnetic object, such as an iron nail or a steel paperclip.
Materials Needed:
- A strong permanent magnet (neodymium magnets are ideal)
- An iron nail or steel paperclip
- Something to test the magnetism (e.g., iron filings or another small metal object)
Steps:
- Choose your object: A steel paperclip or a small iron nail works best. Ensure the object is made of ferromagnetic material.
- Consistent Stroking: Place one pole of your strong magnet on one end of the nail or paperclip. Stroke the object repeatedly in one direction, always moving from one end to the other. Do not change direction. Repeat this process at least 20-30 times.
- Test the Magnetism: After stroking, test your newly magnetized object by seeing if it attracts small iron filings or other metal objects.
Why it Works: The consistent stroking aligns the magnetic domains within the iron object, creating a net magnetic field. The direction of stroking is crucial; reversing direction cancels out the effect.
Tips for Success:
- Use a strong magnet: The stronger the magnet you use, the more effectively it will magnetize your object.
- Consistent pressure and speed: Maintain even pressure and a steady speed while stroking.
- Repeat the process: If the magnetism is weak, repeat the stroking process multiple times.
Method 2: The Electric Current Method (Electromagnetism)
This method utilizes the principle of electromagnetism, where an electric current generates a magnetic field. This is a more powerful method and allows for stronger magnetization.
Materials Needed:
- A battery (e.g., a 9V battery)
- Insulated copper wire (at least 20-30 feet)
- An iron nail or a steel object
- A steel paperclip or iron filings (for testing)
Steps:
- Wrap the wire: Tightly wrap the copper wire around the iron nail, leaving a few inches of wire free at each end. The more coils you have, the stronger the magnet will be.
- Connect to the battery: Connect the free ends of the wire to the terminals of the battery. Observe the nail; it should now be magnetic.
- Test the Magnetism: Test the nail by trying to pick up a steel paperclip or iron filings.
Why it Works: The electric current flowing through the wire creates a magnetic field around the coil. This field magnetizes the iron nail, aligning its magnetic domains.
Important Considerations:
- Safety: The battery can get hot if left connected for an extended period, so do not leave it connected unnecessarily. Ensure proper insulation on the wire to prevent short circuits.
- Experiment with coil density and battery voltage: More coils lead to a stronger magnetic field. A higher voltage battery may also increase the strength of the magnet, but take extra precaution with higher voltage batteries.
Method 3: Using a Powerful Existing Magnet and a Ferromagnetic Object
This technique exploits the influence of a strong magnetic field on a ferromagnetic material. While similar to the stroking method, it’s more efficient.
Materials Needed:
- A powerful neodymium magnet.
- A ferromagnetic object (iron nail, screw, etc.)
Steps:
- Proximity is Key: Place the ferromagnetic object in close proximity to the powerful neodymium magnet for several hours, or even overnight. The closer the better.
- Orient it: Ideally, you should align the object with the magnetic field lines of the neodymium magnet.
- Test the Magnetism: After the allotted time, test the object for magnetic properties. It might be weakly magnetized, so try to pick up a very small metallic object.
Why it Works: The strong magnetic field of the neodymium magnet gradually influences the magnetic domains within the ferromagnetic object, aligning them over time.
Strengthening Your Homemade Magnets
Once you've created your magnet, you can further enhance its strength using the following techniques:
- Re-magnetization: Repeat the process you used to initially create the magnet. Consistent stroking or electrical current application can strengthen the magnetic field.
- Storage: Store your magnets in a protective case or container to prevent damage or weakening of their magnetism. Avoid high temperatures and impacts.
- Avoid Demagnetization: Keep your magnets away from other strong magnets and powerful magnetic fields that could reverse the domain alignment.
Safety Precautions
While making magnets at home is generally safe, it's important to exercise caution:
- Avoid neodymium magnets: These magnets are incredibly powerful and can pinch skin severely. If working with neodymium magnets, handle them with extreme care.
- Proper insulation: When using electricity, ensure the wires are properly insulated to prevent short circuits and electric shocks.
- Supervise children: Always supervise children during these experiments, especially when using electricity or powerful magnets.
Beyond the Basics: Exploring Electromagnetism
The electric current method opens doors to a deeper understanding of electromagnetism. You can experiment with:
- Different coil configurations: Try different coil shapes and numbers of turns to observe their effect on the magnetic field strength.
- Using different cores: Explore the use of different materials as cores for the coil, comparing their magnetic properties.
- Measuring magnetic field strength: If you have access to a gaussmeter, measure the magnetic field strength of your homemade magnets and observe how different parameters affect it.
Making a magnet at home is a fantastic way to learn about magnetism and electromagnetism in a hands-on manner. By following these methods and understanding the underlying principles, you can create your own magnets and explore the fascinating world of physics. Remember to prioritize safety and enjoy the experimental process!
Latest Posts
Latest Posts
-
Which Of The Following Is A Secondary Air Pollutant
Mar 19, 2025
-
How Many Protons Does Xenon Have
Mar 19, 2025
-
Empirical Formula Of Oxide Of Iron
Mar 19, 2025
-
To What Phylum Do Sponges Belong
Mar 19, 2025
-
36 Is What Percent Of 24
Mar 19, 2025
Related Post
Thank you for visiting our website which covers about How Do You Make A Magnet At Home . We hope the information provided has been useful to you. Feel free to contact us if you have any questions or need further assistance. See you next time and don't miss to bookmark.
